System 1032 to Microsoft Access Conversion
Kevin Cole
Gallaudet Research Institute
kjcole@gri.gallaudet.edu
Copyright © 1999
Like it or not (and I don't), System 1032's days at Gallaudet appear to
be numbered. In an effort to prepare for the demise, John Woo and I have
written some conversion tools to ease the transition to Microsoft Access.
We've saved the conversion tools, as well as several others, in a
world-readable System 1032 library named S1032_UTIL. The source code
for the library and documentation (such as it is) has been released under
the GNU General Public
License.
The library contains several routines, but for conversion to Access,
you only need to worry about two of them. The first creates an accurate
Microsoft Access table structure from an System 1032 dataset (preserving
the name, data type and size of each field) and the second exports the
data from 1032 in a format that Access can then import.
These routines should serve as a model for converting 1032 data to
other SQL-compliant database systems, such as Oracle. Unfortunately,
these "new, improved" systems cannot handle many of the things that System
1032 can. For example, neither Access nor Oracle appears to handle a
dataset with more than 255 fields, and only Oracle 8 will handle a field
type of ARRAY. There are other weaknesses to the SQL model, and as far
as I have seen, no real strengths.
Speaking of weaknesses: Microsoft Access, in its own peculiar,
brain-dead way, can execute an SQL script, but cannot read it from a file.
The text must be copied from another window and pasted into an empty
window within Access. This step may be the trickiest part for many people.
With any luck, Oracle won't be so limited.
Follow the steps below to convert your data, and let me know if there's
a problem.
Kevin Cole, 1999
On the VAX:
- Login on the VAX as usual.
- Start S1032 and open your dataset.
NOTE:
Some users have an "automatic startup file" for S1032 that does not allow
them to access the command line. Those users will first need to temporarily
disable this file before starting 1032. To do this, type:
RENAME S1032_INI.DMC
S1032_OFF.DMC
after the $ prompt, before starting S1032.
- Gain access to our tools library by typing:
OPEN LIBRARY S1032_UTIL IN CADS$DISK1:[CADS4.LIB.1032]
READ
- Type DDL followed by the <ENTER> key at the 1032 prompt.
This creates an SQL script file named
DDL_dataset.ASC, (where
dataset is the name of the dataset you had opened at the time you
typed DDL.) This file is analogous to 1032's .DMD file and will be
used later to create an empty Access table.
- Use FIND and SEARCH to select the records you wish to
export. Most users will want to select all records with the command
FIND ALL.
- Type CSV followed by the <ENTER> key at the 1032 prompt.
This creates a Comma Separated Value (CSV) file named
dataset.CSV. This file contains all the data from your
dataset and is analogous to a 1032 .DMI file.
- Exit System 1032, and if you renamed the S1032_INI.DMC, remember to
rename it back again.
For example:
$ RENAME S1032_INI.DMC
S1032_OFF.DMC
$ S1032
Gallaudet University System 1032 Version V9.70-0
Copyright 1997, Computer Corporation of America
1032> OPEN LIBRARY S1032_UTIL IN CADS$DISK1:[CADS4.LIB.1032]
READ
1032> OPEN DATASET dummy
Current dataset is now DUMMY
1032> DDL
Current dataset: DUMMY
Output file for data definition query: DDL_DUMMY.ASC
1032> FIND ALL
umpteen DUMMY records found
1032> CSV
Output text file DUMMY.CSV of umpteen record(s) completed
1032> EXIT
$ RENAME S1032_OFF.DMC
S1032_INI.DMC
$ |
(The RED text in the previous example is
only necessary for users that cannot normally type commands in 1032.)
On the PC:
- Copy the two files you just created from the VAX to the PC, or create
a virtual network drive to the VAX directory where the files are stored.
(This is left as an exercise to the reader. I'm assuming most of you
reading this already know how to do one or the other. NOTE: The
files are ASCII text, not binary. Double-check your transfer method to
make sure you're transferring in ASCII or Text mode.)
- Start Microsoft Access
- Open or create the database that you wish to import your 1032
dataset into.
- Select Queries and build a New query. When offered
the method of creating the query, choose Design View. If the
Show Table menu comes up, close it without selecting a table.
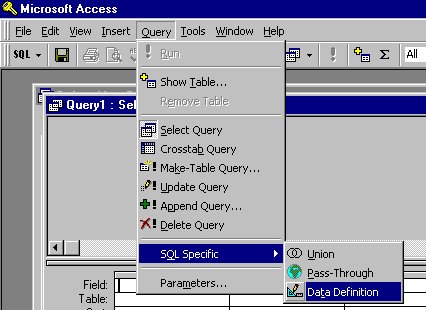
- From the pull-down menu at the top of the screen, choose
Query
SQL Specific
Data Definition

- Minimize Microsoft Access so that you can see your desktop again.
(Click on the _ in the upper right corner, two positions to the
left of the X.)
- Find the DDL_dataset.ASC file.
- Open it with either NotePad or WordPad (or some other very simple
editor.) Most users should be able to simply double-click on the
DDL_dataset icon. Microsoft Windows will recognize it as a text
file and open an appropriate editor.
- From the Edit menu, choose Select All. You should see
all of the text become highlighted at this point.
- From the Edit menu, choose Copy.
- Click on Microsoft Access at the bottom of your screen. If you've
done everything correctly up to this point, your screen should show the
Data Definition Query window.
- On the Edit pull-down menu, choose Paste. Your
highlighted text from the previously opened file should appear.
- Click on the X in the upper right corner of the Data Defintion
Query window, to close and save. When asked if you wish to save the
query, say Yes and give it a logical name like "Create
dataset" (again, using the name of your original dataset in place of
the word dataset).
- Click Open in the Query window. Access should warn you that it
is about to create a table. Tell it OK.
Now you have an empty table with the right definitions in it. Time to
fill it with your data...
On the PC:
- You should still be in Microsoft Access. If not, get there, and open
the database again.
- Switch to the Tables section of Access.
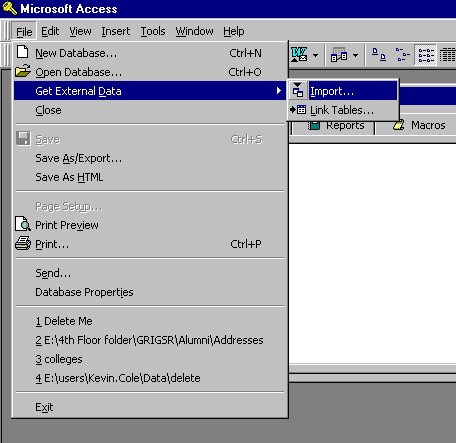
- From the File pull-down menu, choose Get External Data
then Import....
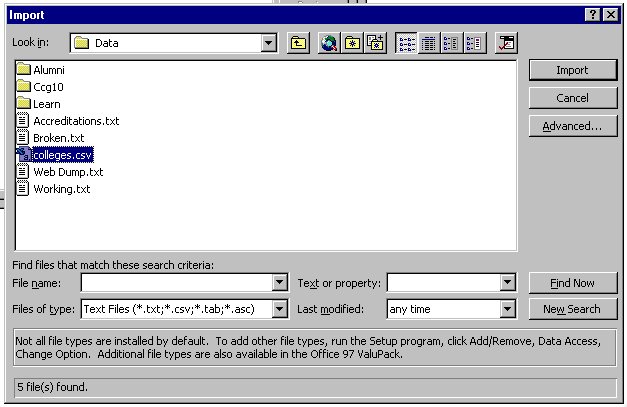
- In the Import window, change the File Type (at the
bottom of the screen) to Text Files (*.txt,*.csv,*.tab,*.asc).
- Find and select the dataset.CSV file that you moved to
the PC. Click Import.
- Access should determine that your data is in Delimited format.
If it does, choose Next at the bottom of the screen. If Access
does not determine that your data is delimited,
something's probably gone wrong, and you should Cancel.
- On the next screen, make sure that Comma is the delimiter,
" (double quote) is the Text Qualifier, and the box saying "First
Row Contains Field Names" is NOT CHECKED. Then choose Next.
- Tell Access that you wish to store your data In an Existing
Table then choose the name of the newly created table from the
pull-down menu to the right of that line.
- Click Next then Finish.
At this point your data should be transferred safe and sound. You can
delete the two generated files (DDL*.ASC and *.CSV) as well
as the Access Create dataset query if you wish, though it might be
handy to hang on to these for emergencies or for study.
| NOTE: |
System 1032 has a special hidden attribute in every dataset named
$ID. This attribute serves as a unique identifier for every record,
and is assigned sequentially to each record. When you create an Access
database by hand, Microsoft Access offers the option of creating a
Primary Key which it names ID, if you have not already
created a primary key from one of your other fields. The above DDL
procedure takes the System 1032 $ID attribute and creates an Access ID
field from it. It also designates ID as the primary key. If this is all
new to you, just know that this is a "good thing". |